Engine Teardown & Inspection


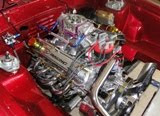
This is the engine for my 427 that just came off the dyno. The logical question is "why tear it down?" The answer is quite simple. This is a very high performance engine that has many one-of-a-kind features and parts. I am going to be installing it in a car that will take years to build. I do not want to have any problems a year or even 20 years after I put it in. The only way to ensure all of the components I installed were chosen correctly is I have to look at how they all worked together. I inspected the main and rod bearings for abnormal wear. The thrust bearing did show some wear, but the amount of torque and horsepower this thing is making that can be expected. The cam and lifters were in excellent condition. The pistons we good except for one that had some skirt scuffs, probably from when the piston stopped firing for a few minutes. The rings were perfect with no blow-by or oil leaks from the bottom up. Absolutely zero problems with the heads and the port/polish worked as designed. The intake manifold was not sealing properly. A small leak at one position was allowing oil to get sucked back up into the intake. I will fix that when I put it back together. One thing I did was have an additional "0.010 shaved off the heads. This removed 1.5 cc's from the overall size increasing the compression to 9.85 from 9.72. This will help a bit with dynamic pressure in the cylinder and maximize potential horsepower. Overall the parts look like they worked together as planned and I can put it back together with a high level of confidence it will last a very long time.

Porting and Polishing


I posted a video on YouTube awhile back about porting and polishing cylinder heads. I had many comments, mostly positive, but there were a couple that claimed polishing the head that much was not good and roughness was needed to create turbulent flow. While that may be true for a naturally aspirated engine, the engine for my Cobra is fuel injected. The only thing going through the intake will be air that will mix with fuel vapor right at the injector and dump right into the cylinder. The picture above is of a freshly machined cylinder head for a 2012 engine. As you can see the runners are very smooth because most engine parts are precision sand cast. Old sand casting for cast iron left very porous surfaces that allowed carbon and other contaminants to build up. New castings are very fine. Precision sand casting and lost foam technologies produce an intake runner that is very close to a final port and polish job. Laminar air flow is more efficient and is being used more and more on newer engine designs. Combined with direct injection, these new manufacturing processes are what give smaller engines more horsepower and better economy.

Billet Timing Pointer


So I am getting ready to take the Cobra motor to the dyno and I just was not happy with the timing pointer. The billet pointer that goes in the regular spot on the right side of the motor is just difficult to see at best because it is covered up by the water pump. Since timing is so critical I decided to make another pointer that goes on the left of the engine which is completely wide open. This will make the job much easier for Joe who is doing the dyno setup for me. Not to mention it will save some money because at $100 an hour I don't want him hunting around and fighting to get the timing right. I just cut this out of a piece of aluminum angle and cut it to a point. After some filing and some polishing it looks pretty good. There already was a boss on the timing chain cover, all I had to do was drill and tap it. Always something to do right up to the last minute.

Engine Transport


So how do you get an engine from you shop to a dyno? Well, there are probably many different ways, but this is my solution. I built this cradle out of 1" square steel tube. I made the plates to bolt to the engine first and built the frame right on the engine. I just measured and cut all the pieces and tack welded them right on the engine. I pulled it off the engine to avoid weld spatter and welded it complete including the gussets. The wheels are 4" swivels from Harbor Freight. What this does is it allows me to lift the engine off the stand and set it right on the ground. The wheels give me the flexibility to roll it up ramps into my vehicle without using a hoist to drop in a truck bed, which would leave opportunity for damage. I made the entire assembly wide enough and have the flexibility to put on other mounts for any engine type up to a big block 454. Since I work on all type of engines I can't restrict tools like this or make them for one engine only. It would take way too much time to build one for every engine I work on. Flexibility is the key. Now I have a nice cradle to put a motor on and roll it around the shop as I need it which is a huge convenience. Engine hoists are very clumsy and I only have one direction to move things on my trolley and hoist.

This is just one idea of many I have that can help you be more productive in your shop. The more time you spend hooking up and moving things around the less time you have your hands on the vehicle actually working.