Powder Coating


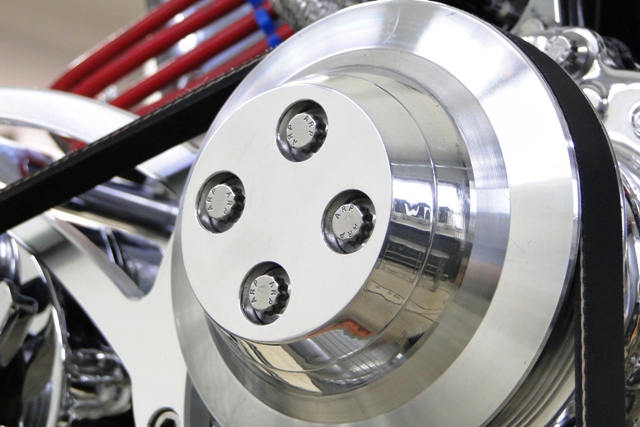
I’ve been getting allot of calls recently about powder coating. There are many experts and places to learn (Eastwood has great tech support), but all I can do is share my experiences, what works, and what doesn’t work for me. First of all I have powder coated all kinds of metal, steel, aluminum, stainless, brass, copper, copper-nickel, and a small piece of titanium. One thing is important regardless of the base material; cleanliness. Starting with an even finish all the way around is critical whether by bead blasting or polishing. All surfaces, including chrome must be 100% de-greased and handled with latex gloves. One fingerprint is enough oil to leave a pattern in the finished product. Aluminum should go through a de-smut or chemical bath to clean the pores. This can be done with a water/battery acid mix 50/50. ALWAYS add the acid to the water and rinse the part thoroughly in purified water.
I have found that preheating the part makes it easier to get an even coat on a dry part, and to make sure the little nooks and crannies get filled. If you are using a translucent powder over chrome it is critical to have a ton of light to get the coat an even color. The chrome must also be spotless. I use lacquer thinner to clean chrome parts. Inspect every part with a strong light to make sure there is powder in every corner. Always follow the recommended temperatures and cooking times.
I think that less is more. A thick coat of powder melts unevenly and does not make it better. A thin, even coat is adequate. You can always re-coat if needed. I have found that a hot part re-coats easier than a cold part, but do what works for you.
Finally, hang the part the way it is going to go in the oven. When you are coating the part it is much easier to avoid hitting or bumping it, which knocks powder off. I hang the part on a spare oven rack and transfer it to the oven by lifting it by the hanging hooks. The only reason I do this is because I coat out in a garage because of the mess, and keep the oven in my clean shop. Don’t rush! Let the part cool down naturally and you’ll have a gorgeous part.

Billet Pulley Cover


Most of the projects I do take a ton of time because I make many custom parts. It's not that I can't use off-the-shelf parts, it's that I have a vision of how I want the finished project to look and that requires custom parts. When building the motor for my Cobra I ran into a problem with water pump selection. I needed a special pulley for the balancer, and the matching pulley for the water pump is usually used for an engine with a fan on it. Since there is no fan on this motor I had a pulley with 8 holes in it and I only needed 4. That left 4 extra holes and an unfinished look. I had some 1/2" 6061 in the shop so I chucked it up in the Tormach personal CNC and wrote a program to drill and countersink the 4 bolt holes. Then the diameter was cut with an end mill. This part was bolted to the water pump pulley and chucked up in the lathe. Working slowly and using a carbide cutter I snuck up on the angle and cut it to size. The final fit was done by hand with emery paper because the profile is not perfectly flat, it has a contour that I followed out to the front. The entire cover was hand wet-sanded and polished. The March pulley came clear powder coated so I sanded down the first angle and polished it to match the cover. The two different finishes follow the style of the rest of the motor where I have polished aluminum and clear powder coated parts. It took just over 3 hours to make this cover and as you can see it finished off the front of that pulley very nice. Including the custom manifold, plated hardware, fabricated air cleaner bottom, powder coating, billet clamps, and polished brass fittings the whole motor took about 6 months to finish. Sure, I was working on other things at the same time, but perfection takes time, and I will stop at nothing to make sure every detail is perfect for the project.


OK....my friend Dennis at Wrazen Machining did most of the machining, but I would rather put my work in the hands of another perfectionist. I think you'll agree the work was worth it.

Cobra Body Modifications


Put the Cobra back up on the jack stands to do some modification work. The first thing I need to do is get the firewall and floor perfectly aligned and fiber glassed to the body. I want to do this so I can remove the entire body as a single unit. The second thing I want to do is make a support that will go from frame rail to frame rail and will follow the shape of the body just in front of the radiator. The purpose of this is to support the front of the car to take all of the weight that is resting on the firewall as is cantilevers off. Without doing this all of the weight distorts the body making it appear that the hood does not fit. After I get that done I can glass on the inner fender wells that make the inside of the engine compartment. I want to reinforce these with aluminum so that I can suspend the entire front of the car on urethane bushings. This will allow me to keep the body separate from the frame and isolate all vibration so it never reaches any of the fiberglass parts that would lead to cracks. I need to get this done before I get the motor back from the dyno so I can just drop it right in. Having the frame up on stands will make it easy to fit the transmission support and check all engine clearance before dropping it back down on the ground. This will also make it easier to fabricate the headers for the side pipes.

Hose Candy Vacuum Lines

I was looking for a vacuum line product to finish off my Cobra engine and I came across Hose Candy at hosecandy.com. This stuff is absolutely incredible. I bought the master kit for $197 which includes enough hose and fittings to do at least 3-4 engines. The thing that makes it so impressive to me is the versatility and ease of the installation. The fittings and hose comes in all sizes and colors you see in the picture above. The kit comes with a wide variety of connectors, adapters, reducers, and elbows to make any application a breeze. The cool thing about the product is that the CNC fittings allow the lines to be put on and removed without struggling to pull a hose over a barbed fitting or large nipple end. A half turn of the fitting and the line comes right off. It takes vacuum lines a quantum leap over all previous technology. Check out my video on YouTube about making the lines and the wide variety of fittings that come with the kit. A huge 2 thumbs up from me.

427 Cobra Engine


This is a 351W 408 stroker going into my 427 Cobra. I am almost ready to take it to the dyno. I just have some more electrical and vacuum line work to do and it's ready to run. When I set out to build it I targeted a minimum of 500 HP but I think it will get at least 550. I started with a basic 351W block and bored it 0.030". It has a forged crank with a custom girdle, H beam rods and SRP pistons. After cc'ing the Racing Head Service heads the compression will be 9.6:1 which will allow it to run on regular pump gas. The intake manifold is a stock Edelbrock dual quad dual plane manifold I modified for fuel injection. I am using the Accel Gen 7 EFI package including two 1050 CFM throttle bodies. Comp Cams custom ground a cam for me that will make it idle around 800 RPM with a wicked slope. It is right on the edge of being a streetable motor that will make this Cobra a rocket. The blue is powder coating and all the hardware is polished stainless. I spared no expense with the price tag for parts topping out just over $15,000. If this were built for someone it would easily be a $60,000 motor because of all the custom parts and painstaking detail. I should have a final build and dyno video posted with a couple of weeks.....stop by my YouTube channel and check it out.