This is the engine for my 427 that just came off the dyno. The logical question is "why tear it down?" The answer is quite simple. This is a very high performance engine that has many one-of-a-kind features and parts. I am going to be installing it in a car that will take years to build. I do not want to have any problems a year or even 20 years after I put it in. The only way to ensure all of the components I installed were chosen correctly is I have to look at how they all worked together. I inspected the main and rod bearings for abnormal wear. The thrust bearing did show some wear, but the amount of torque and horsepower this thing is making that can be expected. The cam and lifters were in excellent condition. The pistons we good except for one that had some skirt scuffs, probably from when the piston stopped firing for a few minutes. The rings were perfect with no blow-by or oil leaks from the bottom up. Absolutely zero problems with the heads and the port/polish worked as designed. The intake manifold was not sealing properly. A small leak at one position was allowing oil to get sucked back up into the intake. I will fix that when I put it back together. One thing I did was have an additional "0.010 shaved off the heads. This removed 1.5 cc's from the overall size increasing the compression to 9.85 from 9.72. This will help a bit with dynamic pressure in the cylinder and maximize potential horsepower. Overall the parts look like they worked together as planned and I can put it back together with a high level of confidence it will last a very long time.
Engine Teardown & Inspection
This is the engine for my 427 that just came off the dyno. The logical question is "why tear it down?" The answer is quite simple. This is a very high performance engine that has many one-of-a-kind features and parts. I am going to be installing it in a car that will take years to build. I do not want to have any problems a year or even 20 years after I put it in. The only way to ensure all of the components I installed were chosen correctly is I have to look at how they all worked together. I inspected the main and rod bearings for abnormal wear. The thrust bearing did show some wear, but the amount of torque and horsepower this thing is making that can be expected. The cam and lifters were in excellent condition. The pistons we good except for one that had some skirt scuffs, probably from when the piston stopped firing for a few minutes. The rings were perfect with no blow-by or oil leaks from the bottom up. Absolutely zero problems with the heads and the port/polish worked as designed. The intake manifold was not sealing properly. A small leak at one position was allowing oil to get sucked back up into the intake. I will fix that when I put it back together. One thing I did was have an additional "0.010 shaved off the heads. This removed 1.5 cc's from the overall size increasing the compression to 9.85 from 9.72. This will help a bit with dynamic pressure in the cylinder and maximize potential horsepower. Overall the parts look like they worked together as planned and I can put it back together with a high level of confidence it will last a very long time.
Posted by Pete's Hot Rod Garage 0 comments
Labels: 427 cobra, accel EFI, adding fuel injection, Comp Cams, Custom Engine, Cylinder Heads, Edelbrock, intake manifold, Porting and Polishing, Scorpion Racing Products, SRP Pistons
Porting and Polishing
Posted by Pete's Hot Rod Garage 0 comments
Labels: Aluminum Polishing, Cylinder Heads, Porting and Polishing
Billet Timing Pointer
So I am getting ready to take the Cobra motor to the dyno and I just was not happy with the timing pointer. The billet pointer that goes in the regular spot on the right side of the motor is just difficult to see at best because it is covered up by the water pump. Since timing is so critical I decided to make another pointer that goes on the left of the engine which is completely wide open. This will make the job much easier for Joe who is doing the dyno setup for me. Not to mention it will save some money because at $100 an hour I don't want him hunting around and fighting to get the timing right. I just cut this out of a piece of aluminum angle and cut it to a point. After some filing and some polishing it looks pretty good. There already was a boss on the timing chain cover, all I had to do was drill and tap it. Always something to do right up to the last minute.
Posted by Pete's Hot Rod Garage 0 comments
Labels: Billet Aluminum, timing point
Engine Transport
This is just one idea of many I have that can help you be more productive in your shop. The more time you spend hooking up and moving things around the less time you have your hands on the vehicle actually working.
Posted by Pete's Hot Rod Garage 0 comments
Labels: engine cradle, engine transport
Powder Coating
Posted by Pete's Hot Rod Garage 0 comments
Labels: Powder Coating
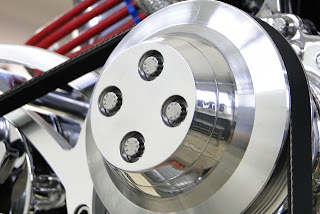
Billet Pulley Cover
OK....my friend Dennis at Wrazen Machining did most of the machining, but I would rather put my work in the hands of another perfectionist. I think you'll agree the work was worth it.
Posted by Pete's Hot Rod Garage 0 comments
Labels: Aluminum Polishing, Billet Aluminum, March Pulley, Pulley Cover
Cobra Body Modifications
Put the Cobra back up on the jack stands to do some modification work. The first thing I need to do is get the firewall and floor perfectly aligned and fiber glassed to the body. I want to do this so I can remove the entire body as a single unit. The second thing I want to do is make a support that will go from frame rail to frame rail and will follow the shape of the body just in front of the radiator. The purpose of this is to support the front of the car to take all of the weight that is resting on the firewall as is cantilevers off. Without doing this all of the weight distorts the body making it appear that the hood does not fit. After I get that done I can glass on the inner fender wells that make the inside of the engine compartment. I want to reinforce these with aluminum so that I can suspend the entire front of the car on urethane bushings. This will allow me to keep the body separate from the frame and isolate all vibration so it never reaches any of the fiberglass parts that would lead to cracks. I need to get this done before I get the motor back from the dyno so I can just drop it right in. Having the frame up on stands will make it easy to fit the transmission support and check all engine clearance before dropping it back down on the ground. This will also make it easier to fabricate the headers for the side pipes.
Posted by Pete's Hot Rod Garage 0 comments
Labels: 427 cobra, ac cobra, body alignment, fitting a fiberglass body, relieving body stress, street beasts cobra, streetbeasts cobra
Hose Candy Vacuum Lines
Posted by Pete's Hot Rod Garage 0 comments
Labels: CNC Hose Fittings, Hose Candy, Vacuum Lines
427 Cobra Engine
Posted by Pete's Hot Rod Garage 1 comments
Labels: accel EFI, Comp Cams, Custom Air Cleaner, Custom Engine, Edelbrock, Ford Motorsports, Powder Coating, Scorpion Racing Products, SRP Pistons

